> ## Documentation Index
> Fetch the complete documentation index at: https://docs.streamwizard.org/llms.txt
> Use this file to discover all available pages before exploring further.
# The deck
> A phone remote for your cloud OBS. Go live, switch scenes, one thumb.
The deck lives at [streamwizard.org/deck](https://streamwizard.org/deck). It's
built for a phone in one hand while the other holds a gimbal: big touch
targets, no zooming, no tiny menus.
 ## Install it as an app
Open `/deck` in your phone browser and accept the install prompt, or use your
browser's "Add to home screen". It launches full-screen like a native app, no
address bar eating your buttons.
## What's on it
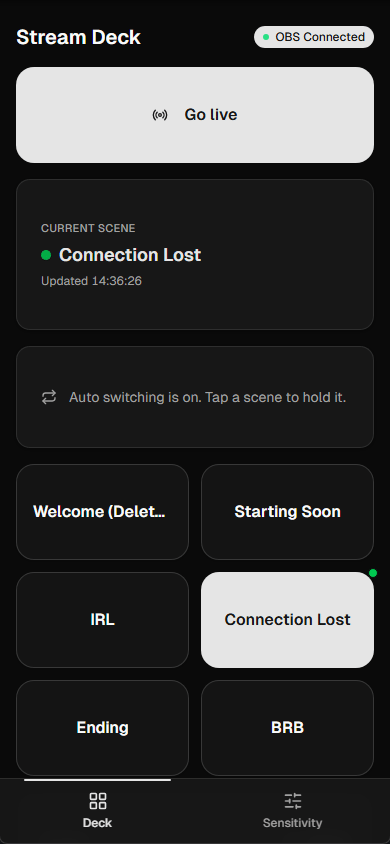
* **Go live / End stream**: one big button. It starts and stops the Twitch
stream from your cloud OBS.
* **Current scene**: what your viewers see right now.
* **Scene tiles**: tap to switch. Any scene whose name starts with `_` or
`-` is treated as internal and hidden here, which is why `_alerts` and
`_incoming-sources` never clutter your tiles. Same rule on the dashboard.
Name your own helper scenes that way and they'll stay out of the way too.
* **Stream status**: your incoming feed's health at a glance.
If your container is off, the deck offers to start it. If you've never set up
cloud OBS, it sends you to [the setup](/irl/cloud-obs) instead. Do that setup
on a laptop or desktop before you head out; the deck is built for running
your stream, not for first-time setup on a phone screen.
## Switching scenes
Tap a tile, your cloud OBS switches. That's the whole thing, and it's the
reason the deck exists: BRB when you walk into a shop, back to IRL when
you're out.
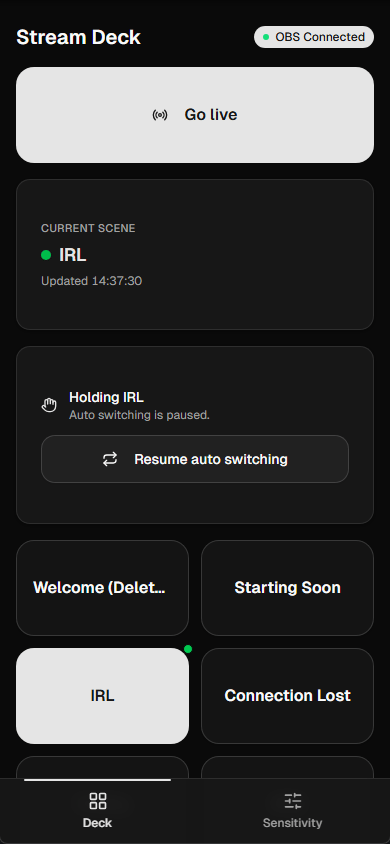
With the [auto switcher](/irl/auto-switcher) running, tapping a tile also
tells it to stand down, so it won't drag you back to a different scene two
seconds later. The deck shows a card with what you're holding and a button
to release it. Release, and the switcher takes over again once your
connection looks good.
## Install it as an app
Open `/deck` in your phone browser and accept the install prompt, or use your
browser's "Add to home screen". It launches full-screen like a native app, no
address bar eating your buttons.
## What's on it
* **Go live / End stream**: one big button. It starts and stops the Twitch
stream from your cloud OBS.
* **Current scene**: what your viewers see right now.
* **Scene tiles**: tap to switch. Any scene whose name starts with `_` or
`-` is treated as internal and hidden here, which is why `_alerts` and
`_incoming-sources` never clutter your tiles. Same rule on the dashboard.
Name your own helper scenes that way and they'll stay out of the way too.
* **Stream status**: your incoming feed's health at a glance.
If your container is off, the deck offers to start it. If you've never set up
cloud OBS, it sends you to [the setup](/irl/cloud-obs) instead. Do that setup
on a laptop or desktop before you head out; the deck is built for running
your stream, not for first-time setup on a phone screen.
## Switching scenes
Tap a tile, your cloud OBS switches. That's the whole thing, and it's the
reason the deck exists: BRB when you walk into a shop, back to IRL when
you're out.
With the [auto switcher](/irl/auto-switcher) running, tapping a tile also
tells it to stand down, so it won't drag you back to a different scene two
seconds later. The deck shows a card with what you're holding and a button
to release it. Release, and the switcher takes over again once your
connection looks good.
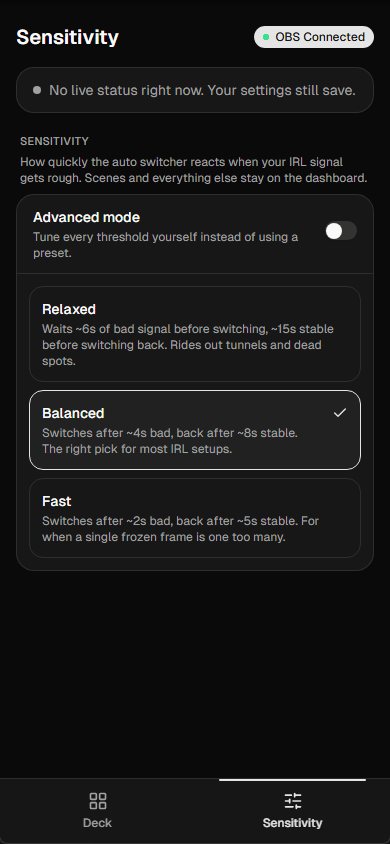
 The bottom bar's second tab has the switcher's sensitivity presets, for when
you move from open streets into a crowded venue. Everything else about the
switcher lives on the desktop dashboard; mid-stream is not the moment to
redesign your scene logic.
The bottom bar's second tab has the switcher's sensitivity presets, for when
you move from open streets into a crowded venue. Everything else about the
switcher lives on the desktop dashboard; mid-stream is not the moment to
redesign your scene logic.